How to Know Which Loop to Crochet Into: Front, Back & Third Loop Guide
When you're learning crochet, one instruction can cause a surprising amount of confusion: “Work into the next stitch.” Which part of the stitch? The front loop? The back loop? Both loops? And where exactly is that mysterious third loop everyone keeps talking about? Understanding crochet loop anatomy makes patterns much easier to read. It also helps you intentionally create ribbing, ridges, texture, and different fabric effects instead of accidentally working into the wrong part of a stitch. In this guide, you'll learn which loop to crochet into, how to identify the front and back loops, where to find the third loop in half double crochet, and what happens when you choose one loop instead of another.
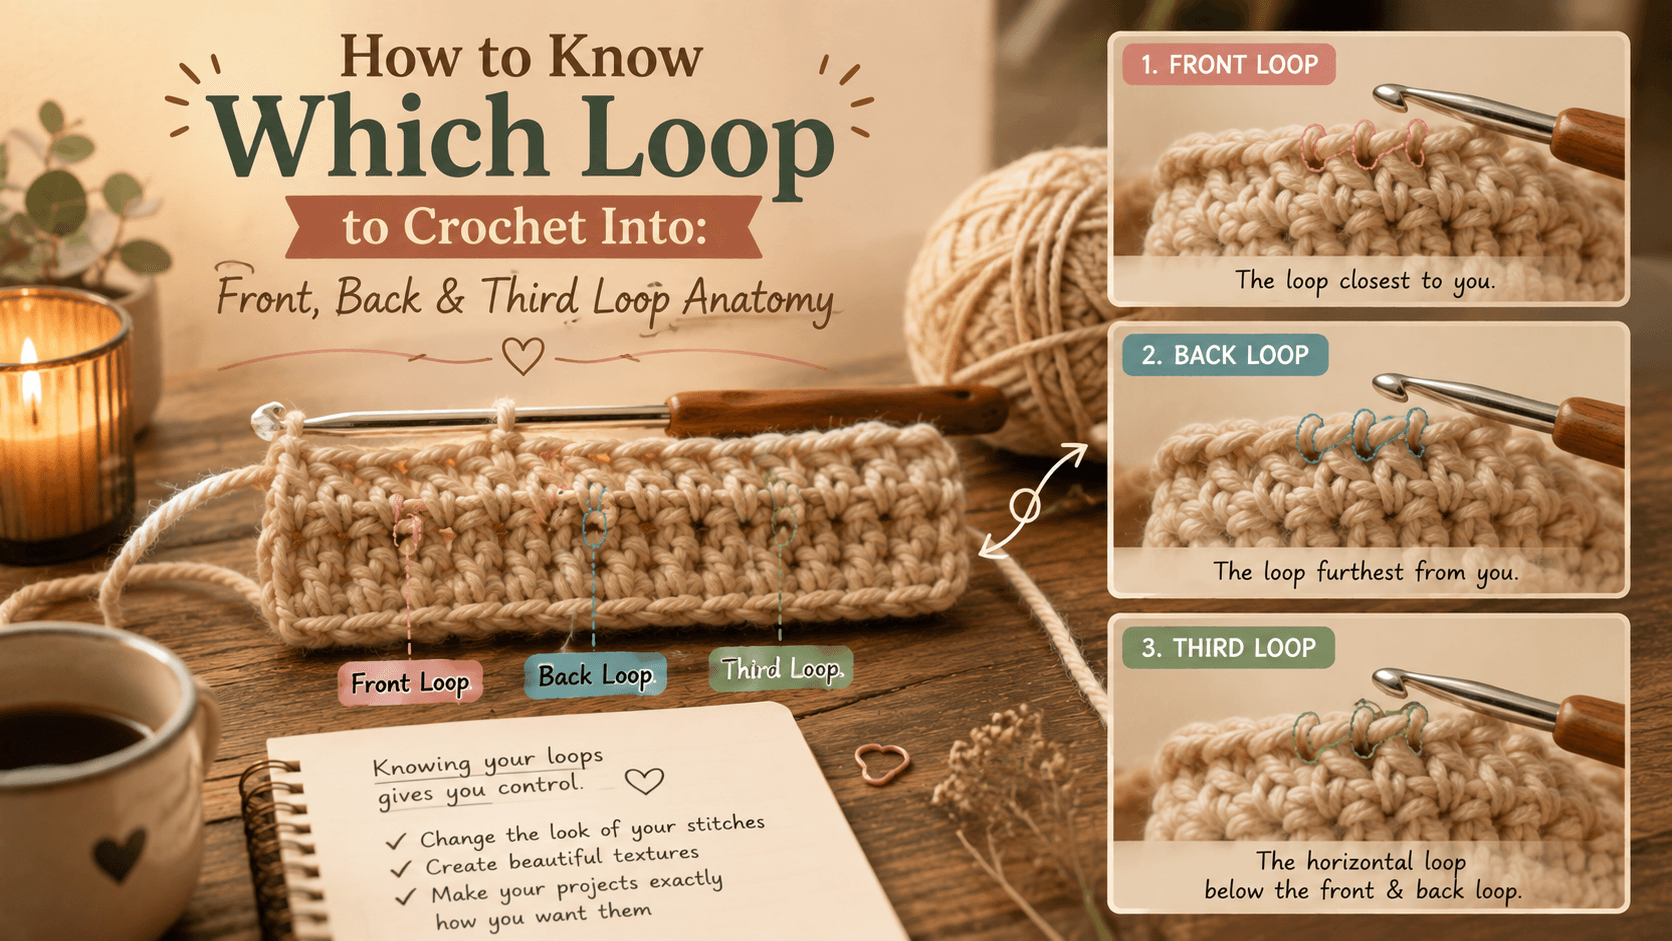
Note: This guide uses standard crochet terminology and focuses on the common US naming system.
First, Look at the Top of Your Crochet Stitch
Before worrying about FLO or BLO, look at the top edge of a completed row.
Most standard crochet stitches create a small V-shaped structure along the top.
That V is made up of two loops:
- The front loop
- The back loop
When you hold the right side of your work facing you, the loop closer to you is generally called the front loop.
The loop farther away from you is the back loop.
In many basic crochet patterns, when the instructions simply tell you to work into the next stitch without mentioning a specific loop, you'll usually work under both top loops.
This gives you the familiar, balanced look of standard crochet fabric.
However, always follow the pattern instructions if they specify a different placement.
Which Loop Do You Crochet Into by Default?
For many standard stitches, the answer is:
Both loops.
Insert your hook under the complete top V of the stitch.
This means your hook passes underneath:
- The front loop
- The back loop
You are not working into just one strand.
Why work through both loops?
Working through both loops helps maintain the standard structure of the stitch.
It usually produces the fabric appearance intended by a basic crochet pattern and avoids leaving one loop behind as a visible ridge.
This is often abbreviated informally as working through both loops, although many patterns simply say:
“Sc in next stitch.”
or:
“Dc in next stitch.”
The pattern doesn't need to say “both loops” every time because that is commonly understood as the standard placement unless another loop is specifically named.
What Is Front Loop Only (FLO)?
FLO means Front Loop Only.
Instead of inserting your hook under both parts of the top V, you work only under the loop closest to you.
The back loop remains unworked.
How to Crochet FLO
- Look at the top V of the next stitch.
- Identify the loop closest to you.
- Insert your hook under that loop only.
- Complete the stitch as normal.
The exact fabric effect depends on the stitch pattern and yarn you're using.
However, because one of the top loops remains unworked, working in FLO can create a visible ridge or line on one side of the fabric.
What Is FLO Used For?
Front Loop Only is commonly used for:
- Decorative ridges
- Shaping
- Adding texture
- Creating fold lines
- Working separate sections into leftover loops
- Certain amigurumi details
One useful technique is working into the front loops first, then returning later to crochet into the unused loops for an additional layer or detail.
What Is Back Loop Only (BLO)?
BLO means Back Loop Only.
Instead of working under the entire top V, you insert your hook under only the loop farther away from you.
The front loop remains unworked.
How to Crochet BLO
- Look at the top V.
- Find the loop farther away from you.
- Insert your hook under that loop only.
- Complete your stitch normally.
When repeated across multiple rows, BLO often creates visible horizontal ridges.
Depending on the stitch and direction of the work, these ridges can give the fabric more flexibility and can create a ribbed appearance.
This is why BLO is commonly used for things like:
- Hat brims
- Sweater cuffs
- Scarves
- Ribbing
- Textured blankets
- Decorative borders
Is BLO Always Stretchier?
Not necessarily.
Working into only one loop can change the flexibility and behavior of the fabric, but the final amount of stretch also depends on:
- Yarn fiber
- Hook size
- Stitch type
- Tension
- Number of rows
- Direction of the ribbing
So it's better to think of BLO as a technique that can create a flexible, ribbed fabric, rather than a guarantee that the fabric will always be stretchy.
Front Loop vs. Back Loop: What's the Difference?
The biggest difference is what happens to the loop you don't use.
Working through both loops
Creates a more standard crochet structure.
Working in Front Loop Only
Leaves the back loop unworked, which can create a ridge or leave a loop available for later stitches.
Working in Back Loop Only
Leaves the front loop unworked and can create repeated ridges and ribbed textures.
Here's a quick comparison:
| Method | Where You Insert the Hook | What Happens |
|---|---|---|
| Both loops | Under the complete top V | Standard crochet structure |
| FLO | Front loop only | Leaves the back loop unworked |
| BLO | Back loop only | Leaves the front loop unworked |
The best choice isn't about which method is “correct.”
The correct loop is simply the one your pattern tells you to use.
What Is the Third Loop in Crochet?
The third loop is most commonly discussed when working with half double crochet (HDC).
Because of the way an HDC stitch is constructed, it creates an additional horizontal strand that can be used as an alternative insertion point.
This is often called the third loop.
The third loop is different from the normal front and back loops at the top of the stitch.
Where Is the HDC Third Loop?
The location can look different depending on which side of the crochet fabric is facing you.
When examining the stitch from one side, the third loop is often found as a horizontal bar positioned behind or below the normal top loops.
If you turn the fabric around, it may be easier to identify.
This is why beginners sometimes struggle to find it: they look only at the top V and expect the third loop to be sitting beside it.
Instead, look slightly behind the top of the HDC stitch for an additional horizontal strand.
How to Crochet Into the HDC Third Loop
Once you've found the third loop:
- Yarn over as you normally would for HDC.
- Insert your hook under the third loop instead of the standard top loops.
- Yarn over and pull up a loop.
- Complete the half double crochet as usual.
Repeated rows of HDC worked into the third loop can create a distinctive textured or knit-like appearance.
The unused top loops remain visible, creating horizontal lines across the fabric.
This technique is popular in projects where you want extra texture or a fabric that looks different from standard HDC.
How to Crochet Into a Foundation Chain
The foundation chain can be confusing because it doesn't look exactly like a completed crochet stitch.
If you look closely, you'll usually notice several possible strands.
The two most common places crocheters work into are:
- The top loop of the chain
- The back bump of the chain
Working Into the Top of the Chain
This is a common approach for beginning a project.
The hook is inserted through the chain as instructed by the pattern.
Depending on the exact technique, this may leave a different-looking edge underneath the foundation row.
Working Into the Back Bump
If you turn the foundation chain slightly, you'll see a small raised strand along the back.
This is commonly called the back bump.
Working into the back bump can create a cleaner-looking foundation edge and can make the underside resemble the top of the crochet fabric more closely.
It is often used when both edges of the finished piece will remain visible.
Neither method is universally better.
Follow the pattern, or make a small swatch and compare the result.
What About Front Post and Back Post Stitches?
Post stitches are different.
With Front Post and Back Post stitches, you're not inserting your hook through the normal top loops of the stitch.
Instead, you work around the vertical body, or post, of the stitch from the previous row.
This creates raised texture.
Front Post
Your hook goes around the post so that the stitch is pushed forward.
Back Post
Your hook goes around the post from the opposite direction, causing the stitch to sit farther back.
Alternating front and back post stitches is one of the techniques used to create textures such as:
- Ribbing
- Basketweave
- Raised patterns
- Cable-like effects
So if your pattern says FPdc or BPdc, don't start searching for the front or back loop.
You're looking for the post.
Common Mistakes When Choosing Crochet Loops
Mistake #1: Accidentally Working in BLO
This happens more often than you might think.
If you accidentally work only through the back loop for several rows, you may suddenly notice horizontal ridges appearing across your project.
The fix is simple: check your stitch placement before continuing.
If your pattern doesn't specify BLO or FLO, make sure your hook is passing under the complete top V.
Mistake #2: Splitting the Yarn
Sometimes your hook catches only part of the yarn instead of the complete loop.
This can make the stitch look fuzzy or uneven.
It happens more often with:
- Splitty cotton
- Loosely plied yarn
- Tight stitches
- Dull or rough hook tips
If you notice that you've split the yarn, it's usually easiest to remove the stitch and work it again correctly.
Mistake #3: Looking for the Third Loop in Every Stitch
The third loop is not something you use by default for every crochet stitch.
When a pattern specifically mentions a third loop, pay attention to which stitch the designer is referring to.
Most commonly, you'll encounter it in instructions involving half double crochet.
An Easy Way to Remember FLO and BLO
Here's the simple version:
Front = closer to you.
Back = farther from you.
So when you're looking at the top V:
- FLO: use the loop in front.
- BLO: use the loop in back.
- No special instruction: usually work through the standard top of the stitch as directed by the pattern.
If you're ever unsure, stop and examine one stitch before continuing.
A few seconds of checking can save you from accidentally creating an entire row of unintended ridges.
How to Practice Identifying Crochet Loops
The easiest way to understand crochet stitch anatomy is to make a tiny practice swatch.
Try this:
Row 1
Work a row of standard single crochet through both loops.
Row 2
Work every stitch through the back loop only.
Row 3
Return to working through both loops.
Row 4
Work through the front loop only.
When you look at the finished swatch, you'll be able to clearly see how the unused loops create different ridges and textures.
You can repeat the experiment with half double crochet and double crochet.
This is one of the fastest ways to stop guessing which loop to crochet into.
Once you've seen the difference with your own eyes, FLO, BLO, both loops, and alternative loop placement become much easier to understand.
Ready to make something?
Put your new skills to use with our free pattern collection.