What Do Crochet Symbols Mean? Complete Crochet Chart Guide for Beginners
Crochet charts can look confusing at first. Instead of written instructions like “chain 3” or “work 2 double crochet stitches in the next space,” you see circles, crosses, lines, dots, and symbols arranged in a diagram. The good news is that crochet symbols are designed to visually show what stitch to make and where to place it. Once you understand the basic symbols and learn how to follow their direction, a crochet chart can sometimes be easier to understand than a long written pattern. This guide explains the most common crochet symbols, how to read crochet charts, how rows and rounds are shown, and why you should always check the pattern's symbol key before starting.
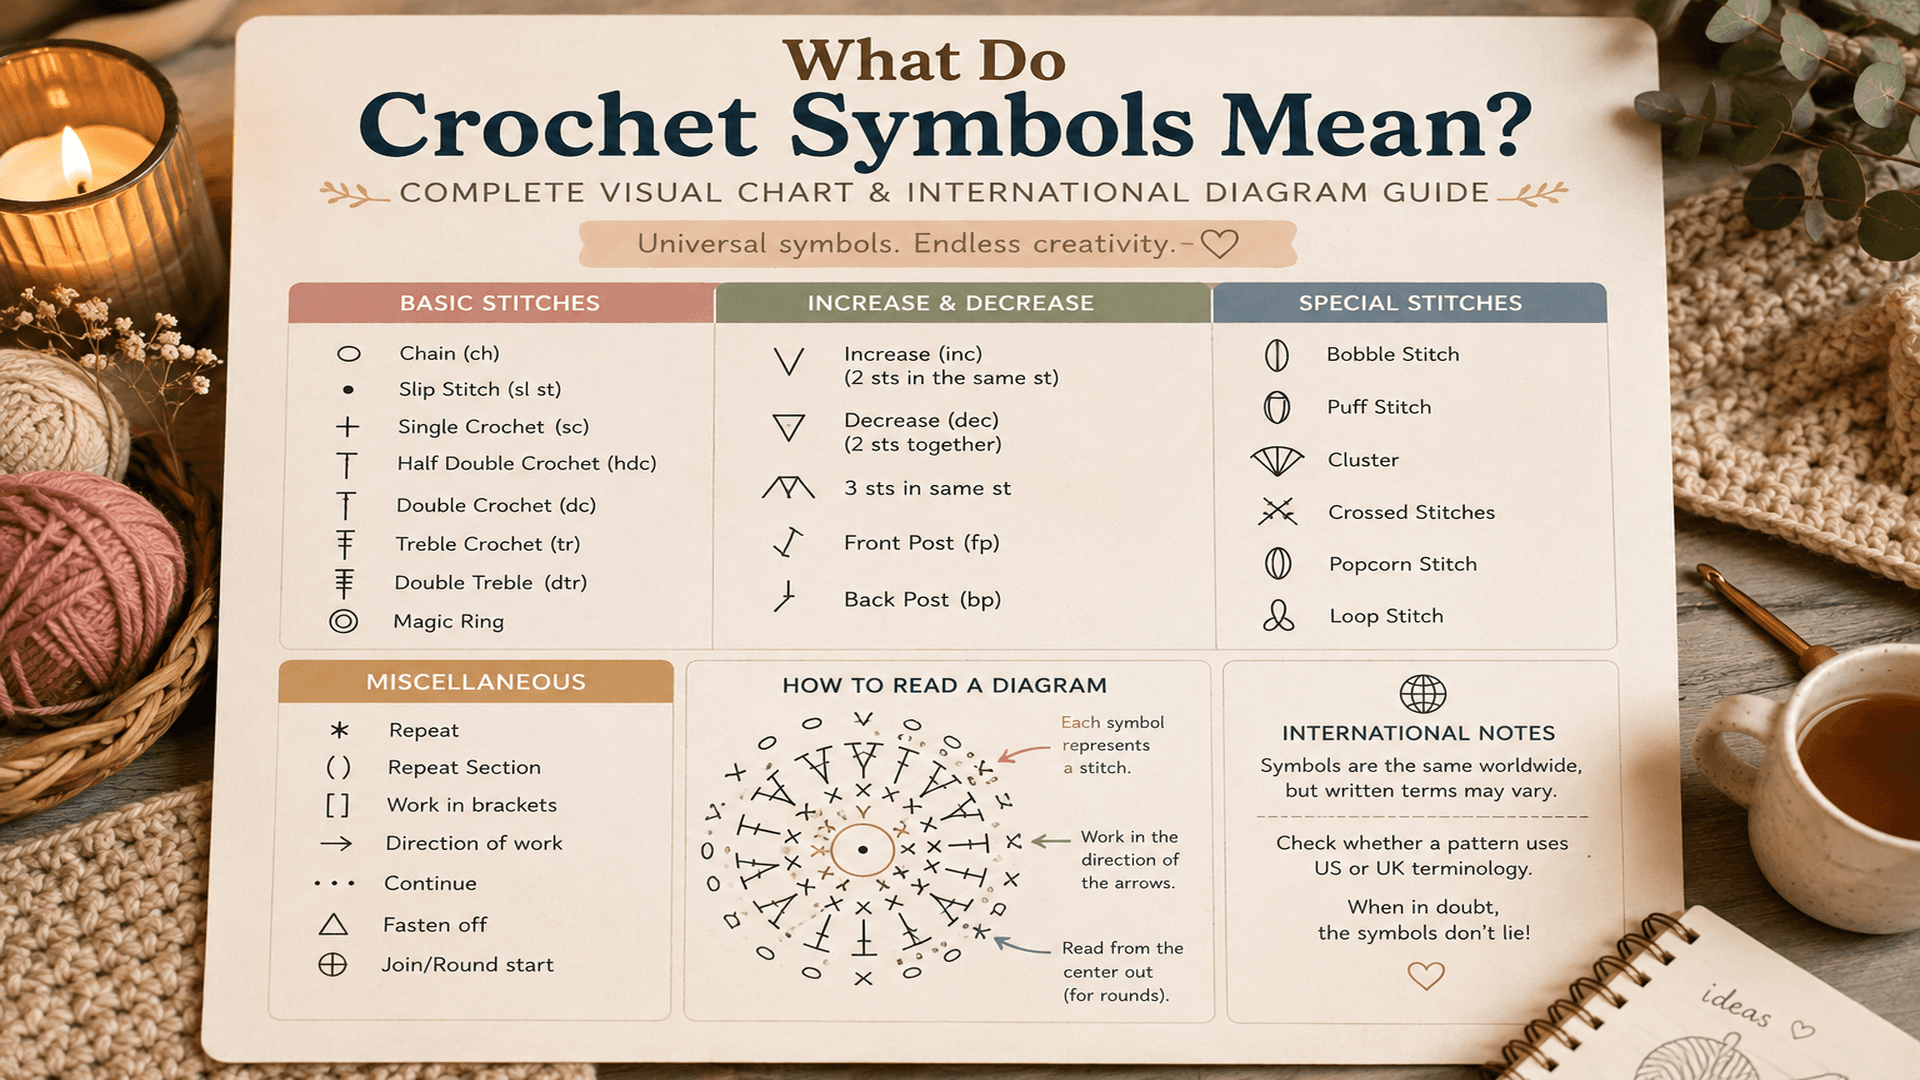
Important: Many crochet chart symbols follow widely used conventions, but they are not guaranteed to mean exactly the same thing in every pattern or publication. Always check the chart legend or symbol key provided by the designer.
What Is a Crochet Chart?
A crochet chart, sometimes called a crochet diagram or crochet stitch diagram, is a visual representation of a crochet pattern.
Instead of describing every stitch with words, the chart uses symbols to show:
- Which stitch to make
- Where to place the stitch
- Which stitches are worked together
- Where increases and decreases occur
- How rows or rounds connect
- The overall shape of the pattern
This is especially useful for visual patterns such as:
- Lace
- Granny squares
- Mandalas
- Doilies
- Motifs
- Filet crochet
- Decorative borders
- Complex textured stitch patterns
A major advantage of a crochet chart is that you can often see the structure of the finished design before you start crocheting.
The First Rule: Always Check the Crochet Symbol Key
Before trying to decode a chart, look for the symbol key, sometimes called a legend.
This is important because crochet terminology and symbol conventions can vary between:
- Countries
- Publishers
- Designers
- Pattern systems
For example, a written pattern may use US or UK crochet terminology. A chart may help show the stitch visually, but the legend tells you exactly how that particular designer defines each symbol.
So don't assume that every cross, line, or circle has exactly the same meaning in every chart.
The symbol key is your reference guide.
Common Crochet Symbols and What They Usually Mean
Below are some of the most common symbols you'll encounter in a crochet chart.
Chain Stitch Symbol
A chain stitch is commonly represented by a small oval or circle.
Several connected chain symbols usually indicate a chain sequence or chain space.
For example:
○ ○ ○
may represent several chain stitches worked one after another.
Chains often form:
- Foundation chains
- Turning chains
- Chain spaces
- Lace arches
- Decorative openings
The exact number of chains should be determined by the individual symbols and the pattern key.
Slip Stitch Symbol
A slip stitch is often represented by a small filled dot or another compact symbol defined in the chart legend.
Slip stitches are commonly used to:
- Join rounds
- Move across stitches
- Close motifs
- Position the working yarn
- Finish certain sections
Because symbol styles can vary, check the chart key rather than relying only on the appearance of the symbol.
Single Crochet Symbol
In many crochet charts, a cross or plus-like symbol represents single crochet in US terminology.
In UK terminology, the equivalent physical stitch is called double crochet.
This is one reason charts can be useful when working with international patterns: the visual symbol may show the stitch structure even when the written terminology differs.
Still, check the legend to confirm the designer's intended terminology.
Half Double Crochet Symbol
Half double crochet is usually represented by a vertical symbol with a horizontal bar.
The symbol visually suggests a stitch that is taller than single crochet but shorter than double crochet.
In US terminology, this stitch is called:
Half Double Crochet (hdc)
The UK equivalent is generally called:
Half Treble Crochet (htr).
Double Crochet Symbol
A double crochet symbol is commonly shown as a vertical line or T-like symbol with a crossbar.
In US terminology, double crochet begins with one yarn over.
The UK name for the equivalent stitch is treble crochet.
This is another reason you should check whether a written pattern uses US or UK terms.
How to Read Taller Crochet Stitch Symbols
One useful feature of crochet charts is that taller stitches often have symbols that visually show their structure.
A vertical line represents the body of the stitch, while additional bars or slashes can indicate the yarn overs used to create taller stitches.
For example, in common chart conventions:
- A basic tall stitch with one yarn over may represent US double crochet.
- Additional bars or slashes generally indicate taller stitches with more yarn overs.
However, the exact symbol design can vary slightly depending on the chart system.
The easiest method is:
Count the symbol features, then check the key.
Once you identify the stitch in the legend, you'll quickly begin recognizing the same symbol throughout the chart.
How to Understand Crochet Symbol Groups
Individual symbols tell you which stitch to make.
But the way those symbols connect tells you how the stitches interact.
This is where crochet charts become extremely useful.
Several Stitches from One Base Point
If multiple stitch symbols emerge from the same point in the row below, the chart is usually telling you to work multiple stitches into the same stitch or space.
This can create:
- Increases
- Shells
- Fans
- Decorative stitch groups
For example, five double crochet symbols coming from one chain space may indicate a shell.
The exact stitch count should be confirmed with the pattern instructions or symbol key.
Several Stitches Joined at the Top
If multiple stitches begin in separate places but join together at the top, the chart may be showing a decrease or a cluster-type stitch.
Depending on the pattern, this could represent techniques such as:
- dc2tog
- dc3tog
- Cluster stitches
- Other joined stitches
The symbol's anchor points are important.
Look at where each stitch begins and where it ends.
Stitches Sharing Both a Base and a Top
Some puff, bobble, cluster, and similar textured stitches may appear as multiple elements grouped around the same area.
These symbols can look complicated, but don't try to memorize them all immediately.
Instead:
- Find the unusual symbol.
- Locate it in the chart legend.
- Learn how the pattern defines that stitch.
- Follow the symbol consistently throughout the chart.
This is much easier than guessing based only on the symbol's appearance.
How to Read Crochet Charts Worked in Rows
A crochet chart for a flat project usually shows rows stacked on top of one another.
If you're crocheting back and forth, the reading direction normally changes with each row because you turn your work.
For example, a chart may be read:
- Row 1 in one direction
- Row 2 in the opposite direction
- Row 3 back in the original direction
The row numbers printed around the chart are your best guide.
Don't rely only on a rule like “always start from the right” because chart orientation can depend on the pattern system and whether the work is intended for right- or left-handed crocheters.
The safest approach:
Find Row 1, locate the starting point, and follow the numbered rows.
Then continue in the direction shown by the chart.
How to Read Crochet Charts Worked in Rounds
Circular crochet charts are usually easier to recognize.
The pattern starts in the center and expands outward.
You'll often see:
- A magic ring or starting circle
- Round 1 surrounding the center
- Round 2 outside it
- Round 3 farther outward
Each new round forms another layer around the previous one.
Look for the round numbers to know where to begin and how to progress.
This style of chart is commonly used for:
- Granny squares
- Mandalas
- Circular motifs
- Doilies
- Flowers
- Coasters
How to Tell Where to Insert Your Hook
This is one of the most useful skills when learning how to read a crochet chart.
Look at where the bottom of the stitch symbol is anchored.
Symbol Anchored to a Previous Stitch
If the bottom of a stitch symbol connects directly to a stitch below, the chart is generally showing that the new stitch should be worked into that stitch.
The exact loop placement still depends on the pattern instructions.
Don't automatically assume “both loops” if the pattern specifies BLO, FLO, post stitches, or another placement.
Symbol Worked into a Chain Space
If the symbol points into an open area or chain space, the stitch is generally worked into that space rather than into a specific stitch.
This is common in:
- Granny squares
- Lace
- Shell patterns
- V-stitch patterns
- Openwork motifs
The visual placement makes it easier to see where the hook should go.
How to Follow a Crochet Chart Without Losing Your Place
Complex charts can become confusing when you're working across dozens of symbols.
Here are a few practical ways to stay organized.
Mark Your Current Row
Use a ruler, sticky note, or digital annotation tool to highlight the row you're currently working on.
This prevents your eyes from accidentally jumping to the wrong row.
Mark Completed Repeats
If a chart contains a repeated stitch section, mark each completed repeat as you finish it.
Count Before Moving On
At the end of a row or round, compare your stitch count with the pattern instructions when a count is provided.
This helps you catch mistakes early.
Enlarge the Chart
Don't force yourself to work from a tiny chart.
If you're using a digital pattern, zoom in.
If you're printing it, use a larger print size when possible.
Clear visibility makes complicated crochet diagrams much easier to follow.
Crochet Charts vs. Written Patterns
Neither format is automatically better.
A written pattern is often easier when you're learning a new stitch or technique because it can explain every action in detail.
A crochet chart can be easier when you want to understand:
- Stitch placement
- Repeating sections
- Overall pattern structure
- Increases and decreases
- Lace arrangements
- Motif construction
Many crocheters prefer patterns that include both a written version and a crochet chart.
The written instructions explain the details.
The chart helps you see the bigger picture.
Why Japanese Crochet Charts Can Be So Useful
Japanese crochet patterns are well known for using detailed diagrams and visual instructions.
Even if you don't understand Japanese, you may still be able to follow parts of a pattern by understanding:
- Crochet symbols
- Stitch placement
- Arrows
- Repeat markers
- Row or round numbers
- The chart legend
However, don't assume that every chart can be followed without understanding any written information.
Important details such as yarn requirements, gauge, sizing, finishing instructions, and special techniques may still require translation or additional explanation.
Think of crochet symbols as a shared visual system with widely used conventions, not as a completely universal language with zero variation.
Common Mistakes When Reading Crochet Diagrams
Mistake #1: Ignoring the Symbol Key
Even experienced crocheters can get caught by this.
Always check the legend first, especially when using a pattern from another country or designer.
Mistake #2: Following the Wrong Row Direction
If you suddenly find that your stitch placement doesn't match the chart, stop and check the row numbers.
You may be reading the correct symbols in the wrong direction.
Mistake #3: Looking Only at the Symbol and Not Its Anchor
A double crochet symbol doesn't tell you everything by itself.
You also need to see where the bottom of that symbol connects.
That tells you whether the stitch goes into:
- A stitch
- A chain
- A chain space
- A post
- Another designated location
Mistake #4: Assuming Every Symbol Is Universal
This is probably the biggest mistake.
Crochet charts use widely recognized conventions, but different publishers and designers can use variations.
The pattern's legend should always have the final word.
A Simple Way to Practice Reading Crochet Symbols
Don't start with a complicated lace tablecloth 😭
Find a small chart with:
- Chains
- Single crochet
- Double crochet
- A few chain spaces
Then practice reading it one row at a time.
Before making each row, look at the chart and ask yourself:
What stitch is this?
Where does it begin?
Where does it connect?
Am I working into a stitch or a space?
After a few small projects, the symbols start feeling much less like random drawings.
You'll begin recognizing common stitches almost instantly.
Quick Crochet Chart Reference
| What You're Looking At | What It Tells You |
|---|---|
| Symbol shape | Which stitch to make |
| Symbol height | Relative height of the stitch |
| Extra bars or slashes | Often indicate additional yarn overs or a taller stitch |
| Multiple symbols from one point | Multiple stitches in one stitch or space |
| Symbols joining at the top | A decrease, cluster, or joined stitch |
| Symbol anchor point | Where the stitch is worked |
| Row numbers | Where to start and which direction to follow |
| Repeated sections | A repeating stitch pattern |
| Symbol key | The designer's exact meaning for each symbol |
Final Thought
Learning crochet symbols and charts might feel slower than following written instructions at first, but it can become one of the most useful skills in your crochet toolkit.
The biggest trick is not trying to memorize hundreds of symbols.
Learn the common ones first, always check the legend, and focus on where each symbol begins and connects.
Soon, you'll be able to look at a crochet diagram and see more than random lines and circles—you'll actually see the pattern forming before you even pick up your hook.
Ready to make something?
Put your new skills to use with our free pattern collection.